Wednesday, October 31, 2007

Happy BOO to You!!!


I hope everyone is having a great Halloween. I have had 6 trick-or-treaters so far tonight. In my previous post I told you about my "dietitian moment" of deciding to pass out clementines and toys instead of candy. It is possible that I did disappoint one little guy who said "Hey, I don't want this!" when i put his clementine in his sack.... Oh well... what is cute and yummy to me may not be so cute and yummy to a 4-year-old. I altered these letters in honor of the season a couple of weeks ago and have really enjoyed them. They were very simple, esp. since they came painted white and i only covered the front with the Reminisce DP. I used modge podge to glue and seal each letter and added some coordinating ribbon to each letter. It only took me about 30 minutes to do all three + drying time. A quick and easy project that I plan on replicating for future holidays. Have a great evening, thanks for visiting.

Tuesday, October 30, 2007

Trick or Treat, Smell my Feet

Since Halloween is one of my favorite holiday's, I wanted to be festive tonight. I have been spending all night getting ready for tomorrow. Instead of candy, this year I am passing out clementines (They had some extra small ones at the grocery tonight.... so cute.. I had to buy them!) and some spooky toys. I bought this stamp set from My Favorite Things in the summer. I love the cute little trick or treaters!!! The tab holding the card closed is chipboard covered in crystal effects and glitter. the ribbon is from Joann's that I bought last year at the after Halloween sales. The designer paper is made by Reminisce. I have really enjoyed using this paper. Those of you who know me, know that I love Halloween... well i just love any thing festive and loud and fun!! I have another project I will show you tomorrow using some more of Reminisce's Halloween line.

Monday, October 29, 2007

Charming Gardeners

I made this card for the Technique Lovers Challenge over at SCS. This is for TLC140: Cracked Glass. I love this technique. It really gives a professional/finished appearance. For this image i stamped the image from Sidekick Sayings Hostess Stamp set in Basic Gray Ink. (I love this sentiment... it may be one of my favorites.) I then colored in the image with Stampin' Write markers in Ruby Red, Cameo Coral, Old Olive, and Garden Green. I then distressed the image with river rock ink. The "cracked glass" is layers of clear embossing powder layered and heated with a heat gun until a thick "glass" is made over the image. The image is then placed in the freezer for a few minutes and the bent repeatedly to make the cracks. I then rubbed basic gray ink over the image with a makeup sponge to highlight the cracks. I pierced the image and mounted on a piece of Basic Gray cardstock. The background is Cameo Coral cardstock that is distressed with River Rock ink. Thanks for looking. Let me know what you think!!

Put Your Foot Down!!!

Nope, not discussing stands on issues. I am discussing sewing machines. You see my sister started teaching a class on some Monday nights for some of our friends (including myself) who wanted to learn how to sew. Several of us own machines, but have not taken the time to learn to use them. My sister, Anna, is a very talented seamstress. In fact she made my wedding dress. The only sewing experience I have is a hemmed lab coat (that Anna mostly completed) and an apron that i made over the course of 5 days last week. So, I get a phone call this morning that goes something like this:


Anna: I'm sick, I don't think I can sew tonight.
Me: That's OK, we'll just cancel.
Anna: Oh, but everyone was looking foward to it. I think you could teach. We are making aprons.
Me: Are you sure I can teach?
Anna: Oh, you'll be fine.
Me: But I have only made one thing.... ever
Anna: But they will be so disappointed, I hate to cancel.
Me: Okay, I'll let everyone know.


So... I agreed to it.... I was actually impressed that our night went as well as it did. We only had a few major tangles and luckily Mary Jo came to help after Rachel (one of my friends) summoned her. The main problem that we had is written in the title of this post. Why is it so hard to remember to put the foot down on the sewing machine?!


Jenny celebrating a successful seam.


Dana, Dana, Rachel and Lindsay all lined up.

Sunday, October 28, 2007

Color Challenge 137


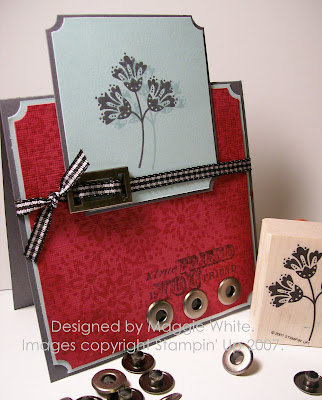
I did this card for Splitcoast Color Challenge 137. The challenge is to use Purely Pomegranate, Basic Grey, and Soft Sky. I used the True Friend Set for this card. This is a tent topper card. The card base is a 4 1/4 x 8 1/2 piece of basic gray cardstock scored at 4 1/4. I stamped a background on the textured pomegranate layer. The sentiment is stamped in basic gray ink. The main image is stamped twice, once in basic gray and once in soft sky for the shadow effect. I used the jumbo eyelets in pewter at the bottom right of the card. I also used the ribbon slide from Hodgepodge Hardware with the black gingham ribbon. Hope you like it!!

It's Beginning to Look a Lot Like Christmas...


Well... it's not looking like Christmas yet, but it sure is time to get those Christmas cards ready!! I am so behind... if I think about it too much I get all anxious and itchy. This card is part of the Sketch Challenge from last week over at SCS (SC146). If you haven't tried the challenges over at Splitcoast, you really should check it out. The challenges provide so much inspiration and starting points for cards, scrapbook pages, etc. This card uses one of Stampin' Up's level one hostess sets. I wasn't able to get a very good picture of this card.. but I wanted to share anyways. I used the Dashing DP for the background that is matted with real red and very vanilla. The image is from Sidekick Sayings which is a hostess set. (If you live in the Nashville, TN area, feel free to contact me to set up a party so that you can earn a hostess set.) The image is stamped in basic gray ink. The tree is colored in with old olive and the brads are the fire rhinestone brads from Stampin' Up. It is hard to tell from the picture, but i used a mixture of the red and yellow rhinestone brads. The star at the top of the tree is covered in glitter and the main image is popped up on dimensionals. I also used a mini library clip from the Holiday Mini in silver. The ribbon is non-SU red organdy ribbon. Thanks for looking. Have a great week.

A True Friend is You Friend


This design layout is from Beate's Weekend Sketch Challenge. It is always good for me to check out challenges when I lack inspiration. This is a Z-fold card. Beate also has a tutorial for this on her blog. This was my first Z-fold card and I will definitely be making more of these. I used the True Friend Set from the Holiday Mini Catalog. This stamp set is available through November 30 so contact me if you want to order. The paper is the Apple Cider DP and it coordinates with the stamp set. Gotta love anything that makes designing cards easier :) . The card base is made of Wild Wasabi Card stock. I also used River Rock and Really Rust Card stock for matting. The main image is stamped on Whisper white in River Rock and several of the panels are distressed with River Rock ink and a makeup sponge. On the back designer paper I stamped the smaller flower image from the set in river rock a few times to enhance the background. The sentiment reads "A true friend is you friend" in Really Rust ink. This is easily read when the card is closed. Pewter Brads are used around the sentiment and there is quite a bit of paper piercing. Thanks for looking!

Friday, October 19, 2007

More Stems


I wanted to show everyone this card as well. I really like simplicity. I used Stem Silhouettes again on the textured soft sky background. The "stem was stamped repeatedly and stamped off in soft sky. The darker image is in bayou blue and the sentiment is in chocolate chip. More paper piercing on the corners and eyelets on the bottom. The main panel is popped up on foam tape. Thanks for looking and have a great weekend.

Yeah, It's Friday


I am so glad it is Friday!!! Maybe I can get some stamping done this weekend. David and I went to dinner tonight with our good friends, Rachel and Anthony. It is so good to get out and relax! I have been playing with Stem Silhouettes this week and will have some more cards to show you this weekend.


This color scheme is a little out of my norm... a little more muted than my usual, but i am really happy with this. May be my "new look" (or maybe not).


Anyways, this is a 5 1/4 inch square card. The card is made of Sahara Sand cardstock. I used Fall Flowers DP mounted on Old Olive cardstock for the background. I added depth by stamping the main image twice: once in Old Olive and once in Sky Blue. Same with the sentiment. I used white organdy ribbon around the central image and the Photo Corner Punch on opposite corners. The brads are from Stampin' Up in pewter.


Saturday, October 13, 2007

MY FIRST POST!!!!


Hi everyone... I am so glad to be posting finally. Here is a card that I created tonight. I used Stampin' Up's Stem Silhouettes from the Holiday Mini Collection.... It was my first time to use this set.. so pretty, lots of options... Anyways, another thing I love is that the rubber is die cut for all of the sets from the mini. So, no cutting!!! Yeah!!


  • Paper: Old Olive, Ruby Red, Kraft, Fall Flowers DP

  • Ink: Old Olive, Ruby Red

  • Accessories: Ticket Corner Punch, Paper Piercing tool, mini brads in gold, I also used a white gel pen to highlight the berries on the stem.